Difference between revisions of "WordPress"
m |
(Added a better explanation on how to install WordPress ps. stinky Tyler :P) |
||
| Line 8: | Line 8: | ||
. | . | ||
Once you've downloaded and extracted the file, visit your web server to continue with the installation process. | Once you've downloaded and extracted the file, visit your web server to continue with the installation process. From here you must create a Database for WordPress, we use MySQL the instructions for creating a database within MySQL goes as follows. | ||
=== Accessing MySQL === | |||
First of all log onto your webserver. (Logan is 24PinTech's webserver) | |||
Once in the webserver and you have access to the command line use this command to go into the MySQL command prompt <code>mysql -u <admin username> -p</code> then type in the password associated with your admin user. Upon success you should see a prompt that looks like such: | |||
Welcome to MySQL monitor. Commands end with ; or \g. Your MySQL connection id is 5340 to server version: 3.23.54 . Type 'help;' or '\h' for help. Type '\c' to clear the buffer. | |||
Run the following commands to create the database, <code>CREATE DATABASE <database name>;</code> then, <code>GRANT ALL PRIVLEGES ON <database name>.* TO "<wordpress username>"@"<host name>"</code> Replace wordpress username and host name with the desired names. Do the same when it asks for a password. | |||
To finish the creation of the database run these two commands <code>FLUSH PRIVILEGES;</code> and <code>EXIT</code>then the MySQL monitor will personally say bye to you. | |||
=== Setting up the wp-config.php file === | |||
You can either create and edit the <code>wp-config.php</code> file yourself, or you can skip this step and let WordPress try to do this itself when you run the installation script. (not recommended) | |||
Follow these instructions if you wish to edit the file manually. Navigate to your domain's home directory then copy the <code>wp-config-sample.php</code>file and rename the copy to <code>wp-config.php</code> You can do this using the <code>cp</code> command within Linux, or running <code>sudo cp wp-config-sample.php wp-config.php</code> in your domain's home directory. Edit it using <code>sudo vim wp-config.php</code> press <code>i</code> to enter insert mode and change the following values. <blockquote>'''DB_NAME''' use the name of your database</blockquote><blockquote>'''DB_USER''' use the username of your database</blockquote><blockquote>'''DB_PASSWORD''' use the password of your database</blockquote><blockquote>'''DB_HOST''' use the hostname you determined for your database, whish is usually <code>localhost</code></blockquote>Then you must enter your secret key values. (good luck) To get your secret key values visit this website [https://api.wordpress.org/secret-key/1.1/salt/ here] then go down to where the website matches the file. Enter your 8 unique keys by hand, make sure each character matches exactly, and you use the correct key for the correct slot. ie. <code>AUTH_KEY</code> goes with <code>AUTH_KEY</code> etc. | |||
'''SAVE SAVE SAVE PLEASE''', you should also save while you are editing the file periodically. Save by pressing <code>esc</code> then typing <code>:w</code> and exit by pressing <code>esc</code> and typing <code>:q</code> , alternatively you can save and exit by pressing <code>esc</code> and typing <code>:wq</code>. | |||
=== Finishing Up === | |||
You might have to move all of your WordPress files out of the WordPress directory into your domain's home directory. Do this with the <code>mv</code> command ie. <code>sudo mv wp-config.php /var/www/example.ms</code>. | |||
Visit your webpage to finish the WordPress installation and to make a WordPress account. | |||
==== Links For Extra Explanations ==== | |||
[https://wordpress.org/support/article/how-to-install-wordpress/#step-3-set-up-wp-config-php Installing WordPress] | |||
[https://wordpress.org/support/article/creating-database-for-wordpress/ Creating a Database for WordPress] | |||
==Management== | ==Management== | ||
Revision as of 21:11, 31 December 2020
Introduction
WordPress is a content management system (CMS) that is functions primarily serve our homepage to users that would like to get help or discover more about the program. It's a very powerful platform that grants administrators creative freedom over whatever they want on their website.
Installation
The installation for WordPress is really simple. All you have to do is download the compressed file for the installation and extract it in the directory that you'd want to install it to. You can either download it from their website here or alternatively you can download it using wget. The command would be sudo wget https://wordpress.org/latest.tar.gz on UNIX systems (if you're using aptitude for your package manager.) Once you've downloaded the file, run sudo tar -xzvf latest.tar.gz to extract it.
.
Once you've downloaded and extracted the file, visit your web server to continue with the installation process. From here you must create a Database for WordPress, we use MySQL the instructions for creating a database within MySQL goes as follows.
Accessing MySQL
First of all log onto your webserver. (Logan is 24PinTech's webserver)
Once in the webserver and you have access to the command line use this command to go into the MySQL command prompt mysql -u <admin username> -p then type in the password associated with your admin user. Upon success you should see a prompt that looks like such:
Welcome to MySQL monitor. Commands end with ; or \g. Your MySQL connection id is 5340 to server version: 3.23.54 . Type 'help;' or '\h' for help. Type '\c' to clear the buffer.
Run the following commands to create the database, CREATE DATABASE <database name>; then, GRANT ALL PRIVLEGES ON <database name>.* TO "<wordpress username>"@"<host name>" Replace wordpress username and host name with the desired names. Do the same when it asks for a password.
To finish the creation of the database run these two commands FLUSH PRIVILEGES; and EXITthen the MySQL monitor will personally say bye to you.
Setting up the wp-config.php file
You can either create and edit the wp-config.php file yourself, or you can skip this step and let WordPress try to do this itself when you run the installation script. (not recommended)
Follow these instructions if you wish to edit the file manually. Navigate to your domain's home directory then copy the wp-config-sample.phpfile and rename the copy to wp-config.php You can do this using the cp command within Linux, or running sudo cp wp-config-sample.php wp-config.php in your domain's home directory. Edit it using sudo vim wp-config.php press i to enter insert mode and change the following values.
DB_NAME use the name of your database
DB_USER use the username of your database
DB_PASSWORD use the password of your database
DB_HOST use the hostname you determined for your database, whish is usually
localhost
Then you must enter your secret key values. (good luck) To get your secret key values visit this website here then go down to where the website matches the file. Enter your 8 unique keys by hand, make sure each character matches exactly, and you use the correct key for the correct slot. ie. AUTH_KEY goes with AUTH_KEY etc.
SAVE SAVE SAVE PLEASE, you should also save while you are editing the file periodically. Save by pressing esc then typing :w and exit by pressing esc and typing :q , alternatively you can save and exit by pressing esc and typing :wq.
Finishing Up
You might have to move all of your WordPress files out of the WordPress directory into your domain's home directory. Do this with the mv command ie. sudo mv wp-config.php /var/www/example.ms.
Visit your webpage to finish the WordPress installation and to make a WordPress account.
Links For Extra Explanations
Creating a Database for WordPress
Management
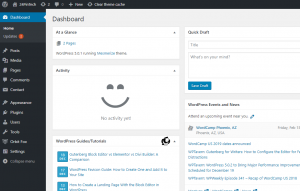
WordPress was created with the user's experience in mind. The dashboard is very intuitive, and the community is large enough to have answers to most questions/problems. In order to manage a WordPress powered website, you need to use the admin dashboard. In order to get to it, go to the WordPress installation's root directory and then navigate to the /wp-admin directory (i.e. website.com/wp-admin). From there, you can edit posts, the theme, pages, plugins, and more. If you don't know how to do something, Google it! The WordPress community has been around since 2003, so your question has most likely been asked and answered before.
Logging In
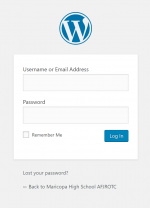
In order to log into WordPress, go to website.com/wp-admin (replace website.com with your domain).
Creating Accounts
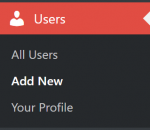
If you need to create an account, go to Users → Add New from the WordPress dashboard. From there, fill out all of the information for the new account and press the Add New User button.
If you need to edit any of the users (change username, reset password, etc), navigate to Users → All Users and click on the one that you need to modify.
Adding Menu Items
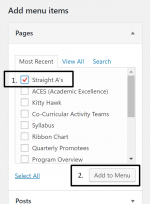
Before you can add an item to your primary menu, you need to have a new (or preexisting) page. If you need to create one, go to Pages → Add New and create it. Once it's created, navigate to Appearance → Menus and draw your attention to the Add Menu Items section. Find your new page in the list and click on the checkbox and click Add To Menu.
Editing Page Contents
lksjdfladsjf
Adding/Modifying Themes
adfadfasdf
Uploading Images
ldkfjalkdfj
Troubleshooting
f after an installation you get prompted for FTP credentials, add the following line to the wp-config.php file in the directory that WordPress was installed
define(“FS_METHOD”, “direct”);


