Difference between revisions of "Wazuh"
Monsterhouse (talk | contribs) |
Monsterhouse (talk | contribs) |
||
| Line 27: | Line 27: | ||
# Enter the command: <code>.\wazuh-agent-4.2.5-1.msi /q WAZUH_MANAGER="10.21.25.12" WAZUH_REGISTRATION_SERVER="10.21.25.12" WAZUH_REGISTRATION_PASSWORD="password"</code> | # Enter the command: <code>.\wazuh-agent-4.2.5-1.msi /q WAZUH_MANAGER="10.21.25.12" WAZUH_REGISTRATION_SERVER="10.21.25.12" WAZUH_REGISTRATION_PASSWORD="password"</code> | ||
'''Wazuh Agent''' '''Mac Configuration''' | '''Wazuh Agent''' '''Mac Configuration''' | ||
When installing on a mac, once the package is installed, configure it to whatever drive it will be on and make sure to keep the package after the installation of the agent is complete. When that is finished, check the library to see if the '''Ossec file''' for the agent is there to ensure it has been installed properly. After that you will then open up terminal and run the command down below to register the agent with the manager. Then you will be able to run the command to start the agent and it will automatically relay the data to the manager. If the start up of the agent fails or the agent is shown as never connected on the manager page, make sure that the manger IP is set correctly in the '''ossec.conf''' '''file''' as well as the protocol if the manager IP is correct.*Install the package if not installed already. | When installing on a mac, once the package is installed, configure it to whatever drive it will be on and make sure to keep the package after the installation of the agent is complete. When that is finished, check the library to see if the '''Ossec file''' for the agent is there to ensure it has been installed properly. After that you will then open up terminal and run the command down below to register the agent with the manager. Then you will be able to run the command to start the agent and it will automatically relay the data to the manager. If the start up of the agent fails or the agent is shown as never connected on the manager page, make sure that the manger IP is set correctly in the '''ossec.conf''' '''file''' as well as the protocol if the manager IP is correct.*Install the package if not installed already. | ||
*Find the mac version of Wazuh | *Find the mac version of Wazuh ('''Note: The Macs are very weird to work with and there are plenty of common errors.)''' | ||
*#Go to [https://documentation.wazuh.com/current/installation-guide/packages-list.html#macos this link] and install the correct OS (Mac OS) and version. | *#Go to [https://documentation.wazuh.com/current/installation-guide/packages-list.html#macos this link] and install the correct OS (Mac OS) and version. | ||
*#Open the file and run it. Hit continue for all fields. | *#Open the file and run it. Hit continue for all fields. | ||
*#Open terminal. If it is not on the taskbar go to appfinder>applications>the utilities folder>terminal to access it. | *#Open terminal. If it is not on the taskbar go to appfinder>applications>the utilities folder>terminal to access it. | ||
*#Run this command <code>sudo /Library/Ossec/bin/agent-auth -m 10.21.25.12</code> | *#Run this command <code>sudo /Library/Ossec/bin/agent-auth -m 10.21.25.12</code> ('''Note: If this fails try using the next command''') | ||
*#If | *#If the command from above is asking for a password try running this command <code>sudo /Library/Ossec/bin/agent-auth -m 10.21.25.12 -P password</code> | ||
*#Check if your agent came online. | |||
*#Run this command <code>sudo /Library/Ossec/bin/wazuh-control start</code> | *#Run this command <code>sudo /Library/Ossec/bin/wazuh-control start</code> | ||
*#Verify that the mac is running and is connected. Check the never connected tab | *#Verify that the mac is running and is connected. Check the never connected tab | ||
Revision as of 16:55, 22 September 2022
Wazuh is the SIEM software that is used to make sure that all of our computers are up to standard in terms of system health and to monitor any security events. The Wazuh server lives on Valhalla in an Ubuntu virtual machine named Sleipnir. There are also agents that are deployed onto each device which collect necessary information that will be needed to make a full report on any issues that may be occurring on said system. All of the data is then processed and sent to the manager which takes all of the data and organizes it into one source. It also utilizes Elasticstack which visualizes all of the data the manager has so that everything going on in 24Pintech's systems can be monitored without much hassle.
ㅤ
Configuring Wazuh
Installation Process
Wazuh Manager
The manger can either be installed as a all in-one or distributed deployment. The deployment that has been used is all in-one which has all of the components of Wazuh installed onto the server, Sleipnir, through Ubuntu. Each of the components gets installed through the use of a script in terminal in order to make the process efficient. Once the script has finished installing all of the packages for the software, the manager can be accessed the web by typing in the IP address of system that the manager was installed on into the search bar (https://<manager ip>). Once that is done, you will be taken to the manager page and type in the user name and password, then all of the information on the systems added can be viewed.
Wazuh Agent Windows Configuration
- Get Wazuh running on a computer that already has it installed
- Open command prompt (admin)
- Run the command below
"C:\Program Files (x86)\ossec-agent\agent-auth.exe" -m 10.21.25.12 -P password- If this command worked you are done. If this command fails you need to remove the agent from the list.
- Get Wazuh running on a computer that does not have it installed
- In file explorer navigate to Cisco Curriculum in Midgard (Q:)
- Copy the Deployed Applications folder and paste it in C:
- Change the folder name to Deployed_Applications
- Note that there is likely another folder called DeployedApplications. Be sure not to get them mixed up when renaming the folder
- Run Windows PowerShell as ADMIN
- Enter:
cd c:\Deployed_Applications - Enter the command:
.\wazuh-agent-4.2.5-1.msi /q WAZUH_MANAGER="10.21.25.12" WAZUH_REGISTRATION_SERVER="10.21.25.12" WAZUH_REGISTRATION_PASSWORD="password"
Wazuh Agent Mac Configuration
When installing on a mac, once the package is installed, configure it to whatever drive it will be on and make sure to keep the package after the installation of the agent is complete. When that is finished, check the library to see if the Ossec file for the agent is there to ensure it has been installed properly. After that you will then open up terminal and run the command down below to register the agent with the manager. Then you will be able to run the command to start the agent and it will automatically relay the data to the manager. If the start up of the agent fails or the agent is shown as never connected on the manager page, make sure that the manger IP is set correctly in the ossec.conf file as well as the protocol if the manager IP is correct.*Install the package if not installed already.
- Find the mac version of Wazuh (Note: The Macs are very weird to work with and there are plenty of common errors.)
- Go to this link and install the correct OS (Mac OS) and version.
- Open the file and run it. Hit continue for all fields.
- Open terminal. If it is not on the taskbar go to appfinder>applications>the utilities folder>terminal to access it.
- Run this command
sudo /Library/Ossec/bin/agent-auth -m 10.21.25.12(Note: If this fails try using the next command) - If the command from above is asking for a password try running this command
sudo /Library/Ossec/bin/agent-auth -m 10.21.25.12 -P password - Check if your agent came online.
- Run this command
sudo /Library/Ossec/bin/wazuh-control start - Verify that the mac is running and is connected. Check the never connected tab
There are many issues we may have. Here is what to do if the agent cannot connect to the manager
- Add the manager IP through the ossec config file
- Access the terminal using the instructions from step 3 of the setup.
- Use the command “sudo nano /Library/Ossec/etc/ossec.conf”. If you are not familiar with NANO go here
- Once in the config file navigate down to the manager ip line using the arrow keys.
- Change the “MANAGER_ IP” address to “10.21.25.12” if it is not already.
- Make sure that it is using “TCP” for the protocol.
- Save any changes made to the file by holding CTRL X and then pressing enter twice.
- Restart the agent
- Using the terminal again, run the command “Sudo /Library/Ossec/bin/ossec-control restart”.
- Make sure the agent is registered.
Wazuh Agent Manager
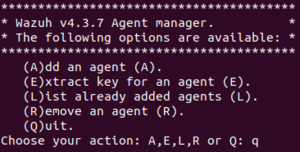
Running this command will open the menu to add, remove, and edit agents (see picture on the right)
/var/ossec/bin/manage_agents
- Add an agent (A)
By entering "A" you can add an agent to the list. All you need is to input the name of the computer you want to add and the computers IP address.
- Extract key for an agent (E)
By entering "E" you can get a new key for an agent. All you need is to input the ID number of the agent. This can be done to help get a new key however this is likely unnecessary as you just need to run one command from command prompt on the agent you are trying to give a key to. (See "Wazuh Agent Windows Configuration")
- List already added agents (L)
By entering "L" you can view a list of every agent and that agents ID number. This can also be viewed from the Wazuh manager page in more detail however this is often a very convenient command when you need to check the list for one agent.
- Remove an agent (R)
By entering "R" you can remove an agent from the manager by entering the agents ID number. This is useful to remove agents we do not need or to remove faulty agents to fix them and get them running properly.
- Quit (Q)
By entering "Q" you can close the menu and return to the normal terminal screen.
Monitoring Wazuh
How to Monitor
There is a lot of information present on the manager page with details on everything connected. Mainly, all the information that will want to be looked at is present on the Security Events, Integrity Monitoring, Agents, and Manager tabs for the information that we will be troubleshooting and coming up with solutions for. The main thing that will need to be looked for are going to be any failures seen on one of the servers or workstations. You will also want to look at the agents connected to see if things are in order or not with connection to the manager. Another thing would be vulnerabilities detected by the manager within our systems and note what kind of vulnerability that it is. The processes being made will also be something that needs to be monitored for any issues on the systems.
What to look for
Modules
Security information management
- Security Events
- Alerts - This will be the main place to look for all of the systems current events taking place as far back as you need to. This will go over any login failures, malware, or anything of that nature will be viewed here across all agents. The key to looking at this all is section through the level of alert going from 1 - 12 with each increase in level being a higher alert that needs to be looked at. Anything above 7 will typically be what is unwanted unless another technician is performing a task that is causing said alerts. Take the proper steps as listed within the policy when any alert is worth being taken to the higher ups for proper handling.
Auditing and Policy Monitoring
- Security Configuration Assessments
- Here will be the most important place to look as you will need to monitor for any faults detected in the system's security. One of each device (All servers need to be checked) and then you as a tech will need to research into the issue if it is important. If there is a major security issue then this can be dealt with either by informing a higher up and getting the all clear to fix it, or if you are already in charge of fixing the security of the systems.
Management
Administration
- This will probably be the most unused section of the SIEM, but if multiple technicians ever take it on then here is where all accounts would be managed depending on the trust within that technician, so restrictions can be set to ensure that all users have the correct access on the server, ensuring that nothing will be used against policy. This is also where rules will be configured for the nodes and clusters mainly for what will be showed on the virtual machine
Status and Reports
- This is where you will be able to generate a status report of the SIEM as well as seeing the status of each manager/cluster. By generating a report you will be given a detailed pdf of everything that has been logged for when you set it and you will be able to go over it and see anything that sticks out instead of having to check each individual module on the SIEM. You will also view the cluster health by seeing if one of the nodes has gone down and needs to be repaired to get it in working order once more.
Agent
- Any and all issues that are had within the agent monitoring page can be checked for in the troubleshooting section of the SIEM: Configuration wiki page.
Active
- Here you will be looking for any and all agents connected to the SIEM. You will look here for any newly added agents that are supposed to be there as well as if they have properly connected.
Disconnected
- You will look here to see if any important agents such as the servers are disconnected due to it being turned off or if it has been inactive for quite a while as they may need to be reset which can be done in many ways.
Never connected
- This will be used to check for any agents that have been connected improperly due to human error or any oversight that had happened during the configuration. If this happens to occur then some of the issues with the setup of an agent should be able to be fixed by viewing previous troubleshooting, but if the issue is unknown, then consult either the Wazuh documentation or a manager.
Reporting
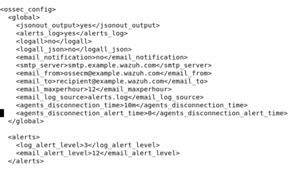
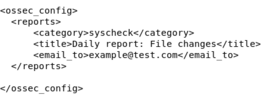
Reports from the manager can be set up to email the information directly to us. In order to do this the Ossec.conf file needs to be edited to set up automatic reports by using the command With this you can choose who will receive it, the frequency of emails, and the level of alert it will send an email for once your information is filled into the box. Once you have made it in there will be a section to input a sending email and the recipient email, whatever your purpose is for receiving the email will most likely be for the higher alerts that need fixing immediately.
This is the command needed to access the ossec.conf file on the virtual machine.
sudo nano /var/ossec/etc/ossec.conf
Warning: Configuring the Ossec.Conf file on either of the nodes or the server web page can lead to the server malfunctioning. Make sure you know exactly what you are doing and/or you have a backup ready before changing anything.
Wazuh Commands:
Agent Config (Agent Side)
net stop wazuh- Stops Wazuh
net start wazuh- Starts Wazuh
Restart-Service -Name wazuh- Restarts Wazuh
"C:\Program Files (x86)\ossec-agent\agent-auth.exe" -m 10.21.25.12 -P password- Obtains a new key and activates an agent
Agent Config (Server Side)
/var/ossec/bin/manage_agents- Opens agent manager. More info on the manager under "Wazuh Agent Manager"
Server Config - Nano
systemctl start/status/stop/restart wazuh-manager/usr/share/kibana/data/wazuh/config/wazuh.yml/var/ossec/etc/shared/dbms/agent.conf/var/ossec/etc/ossec.conf/etc/filebeat/filebeat.yml/etc/kibana/kibana.yml/var/ossec/bin/wazuh-control -j info/var/ossec/logs/active-responses.log


