Difference between revisions of "Midgard/UnRaid"
(Added procedures about the installation of Unraid) |
(Added notes about Unraid Installation) |
||
| Line 19: | Line 19: | ||
== How to Install Unraid:(Based on my Installation on the HP proliant DL 360 G7) == | == How to Install Unraid:(Based on my Installation on the HP proliant DL 360 G7) == | ||
#Go onto a computer and go to https://unraid.net/download and press USB creator then download for your respective OS | |||
# Go onto a computer and go to https://unraid.net/download and press USB creator then download for your respective OS | # After you are in the USB Creator software select your USB flash drive and select your desired Unraid "stable" version of Unraid also name the Flash drive while your in the software and that is what your server name will be. | ||
# After you are in the USB Creator software select your USB flash drive and select your desired Unraid "stable" version of Unraid | |||
# After that check UEFI boot if you have a UEFI mobo if you don't, than don't check it. after that press Write so the software writes the OS to the Flash drive | # After that check UEFI boot if you have a UEFI mobo if you don't, than don't check it. after that press Write so the software writes the OS to the Flash drive | ||
# Make sure to Eject the Flash Drive before removing it from the computer. | # Make sure to Eject the Flash Drive before removing it from the computer. | ||
# Get the server and a monitor make sure to plug ethernet, power cables, and | # Get the server and a monitor make sure to plug ethernet, power cables, and Display cables. Connect the Monitor to the server in order to configure some settings for Unraid. | ||
#Put the USB flash drive with Unraid on it into the server. Boot the server make sure you have everything plugged in. | |||
#Take the Bios out of CLI mode using this guide https://support.hpe.com/hpesc/public/docDisplay?docId=c01155651&docLocale=en_US . After the fix is applied reboot then press F9 to get into Bios | |||
#Configure Bios settings as told- if your booting LEGACY bios enable CSM, Enable CPU virtualization, Enable IO MMU, Set SATA mode to AHCI apply the settings you need from this list and research if you need more. | |||
#Set boot order to either UEFI:Flash drive or USB:Flash drive (USB is for LEGACY bios) | |||
#Before you boot you need to set a Static IP address use this guide start at 0:54 to 3:17 https://www.youtube.com/watch?v=domrAka9BNI use this link to pick an available IP address on the network [[DHCP]] also ask Chamberlain before assigning the IP address you choose. Use CMD on the cube in order to assign the correct Subnet mask and Default Gateway to the server. | |||
#Boot the server and if you're on the appropriate screen press 3. in order to boot the USB DriveKey | |||
#Once you boot into Unraid press enter on the first option called (Unraid OS) then once everything stops loading it should pop up with your assigned static IP address at the bottom of the page. Under IPV4 Address: 10.21.25.16 (EX) | |||
#After it tells you the IPV4 address you assigned go onto the cube and type into a web browser the IP address. It should pop up with Unraid login interface and then just type "root" for username and there is no default password. | |||
==The Creation of Midgard:== | ==The Creation of Midgard:== | ||
Latest revision as of 16:34, 11 October 2022
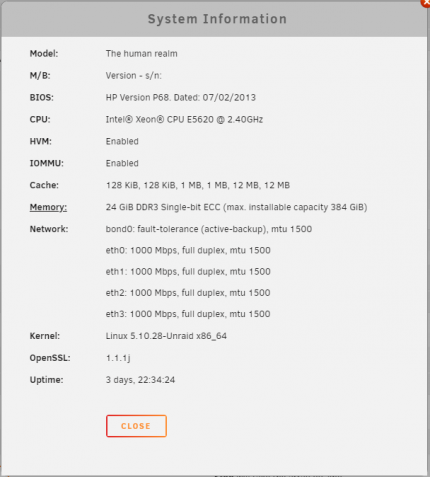
System Information:
CPU: 2x Intel® Xeon® CPU E5620 @ 2.40GHz
RAM:24 GiB DDR3 Single-bit ECC (max. installable capacity 384 GiB)
OS: Linux 5.10.28-Unraid x86_64
Storage: 1.4 TB SERVER storage (used as parity drive), and 9 1TB hdds (8 in a array and one acting as a cache drive)
What is Midgard:
The Midgard Server was designed as a backup server. This server is going to help backup files, data, applications, software, and hardware. Backups help prevent data loss and save our database. Midgard will help backup all sorts of data and files here at 24Pintech. A backup server is an essential for a program like 24PinTech so that we dont lose any valuable information through our database.
What is Unraid:
Unraid is a Operating System that is used for Linux to store and help manage all kinds of data. Unraid helps us create arrays of drives so that all users can access files through our Network. We were originally going to ESXI for our server but the version of ESXI that was going to be utilized was incompatiable.
How to Install Unraid:(Based on my Installation on the HP proliant DL 360 G7)
- Go onto a computer and go to https://unraid.net/download and press USB creator then download for your respective OS
- After you are in the USB Creator software select your USB flash drive and select your desired Unraid "stable" version of Unraid also name the Flash drive while your in the software and that is what your server name will be.
- After that check UEFI boot if you have a UEFI mobo if you don't, than don't check it. after that press Write so the software writes the OS to the Flash drive
- Make sure to Eject the Flash Drive before removing it from the computer.
- Get the server and a monitor make sure to plug ethernet, power cables, and Display cables. Connect the Monitor to the server in order to configure some settings for Unraid.
- Put the USB flash drive with Unraid on it into the server. Boot the server make sure you have everything plugged in.
- Take the Bios out of CLI mode using this guide https://support.hpe.com/hpesc/public/docDisplay?docId=c01155651&docLocale=en_US . After the fix is applied reboot then press F9 to get into Bios
- Configure Bios settings as told- if your booting LEGACY bios enable CSM, Enable CPU virtualization, Enable IO MMU, Set SATA mode to AHCI apply the settings you need from this list and research if you need more.
- Set boot order to either UEFI:Flash drive or USB:Flash drive (USB is for LEGACY bios)
- Before you boot you need to set a Static IP address use this guide start at 0:54 to 3:17 https://www.youtube.com/watch?v=domrAka9BNI use this link to pick an available IP address on the network DHCP also ask Chamberlain before assigning the IP address you choose. Use CMD on the cube in order to assign the correct Subnet mask and Default Gateway to the server.
- Boot the server and if you're on the appropriate screen press 3. in order to boot the USB DriveKey
- Once you boot into Unraid press enter on the first option called (Unraid OS) then once everything stops loading it should pop up with your assigned static IP address at the bottom of the page. Under IPV4 Address: 10.21.25.16 (EX)
- After it tells you the IPV4 address you assigned go onto the cube and type into a web browser the IP address. It should pop up with Unraid login interface and then just type "root" for username and there is no default password.
The Creation of Midgard:
- Downloaded and installed UnRaid.
- Tested the Raid Setup
- Added Midgard to the Domain through SMB settings.
- Rearranged the Array for the server to have a 1.4 TB parity drive using the drives in the server (NOT IN THE ARRAY), 8 1 TB Hard Drives, and a1 TB Cache Hard Drive.
- Created a new Array.
- Set and make the IP Address of the Midgard Server to 10.21.25.13.
- Changed the Name of the server to Midgard.
Switch Configuration When Using LACP And Port Bonding:
When configuring an LACP etherchannel between a switch and UnRaid server use {(C-IF-RANGE)#channel-protocol lacp} on the switch and "active-backup (1)" etherchannel bond on the UnRaid server.
The Community Apps Tab:
Under the apps tab, when clicked on, opens what is best described as an App Store. In this App store there are many community developed apps that can be implemented into UnRaid. They can be a docker (which is a self isolated running application without the need of hardware emulation, and uses OS emulation to run the app), or they can be a plug-in. There are a lot of different apps in this store and a lot of things we can do with them, from running a videogame server, backing up UnRaid to a google drive account, to even hosting it's own fog server locally!
list of installed plug-in's and dockers and what they do:
- Theme Engine: Create or import a custom color theme for the unRAID webGui.
- Community Applications: The One Stop Shop for all applications for unRaid.
- ProFTPd: Allows FTP access through Midgard (https://youtu.be/dJsbBRy_JTM) Login: ftp_pintech Pass: Medium level pass
Troubleshooting:
This section will help aide and find solutions to any problems that can possibly occur on the server.
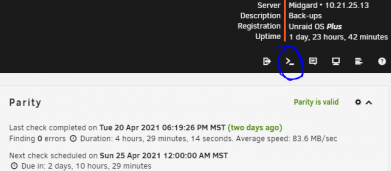
To delete a share in UnRaid, if it is empty, through the web gui under the shares tab, although if not empty and you don't want to delete everything through file explorer then you can do it through the command line which is located in the top right of the web gui (displayed in the image provided). Just copy paste this command into the terminal and replace the placeholder text with what share you want to remove.
rm -rf /mnt/user/Backups/(insert share name here)
Backup Did Not Complete Properly:
If the Backup did not finish that could mean that no files or data were restored. It is also possible that some files were resotred and some were not. Here are a few soloution to this problem.
Identifying The Data That Was Not Restored:
- Open Windows Server Essentials, and select Computer and Backups
- Choose the Device that the backup did not complete succesfully and view the properties.
- Choose the backup that did not complete and view the details.
- The details of the backup will show green check marks on the areas that were successful in the Backup
How to Replace a Bad Drive in the SAS:
- STOP THE ARRAY FIRST; PLEASE FOR THE LOVE OF GOD (it's under the main tab scroll to the bottom)
- Shutdown the SAS (power button is on the back of the MIDGAURD SAS, NOT THE THOR SAS
- Replace the bad drive (it's a hot swap drive, in and out)
- Turn on the SAS & reboot the unraid server. If the array is stopped just hold the power button down on the front for a force shutdown (MAKE SURE THE ARRAY ISN'T ONLINE and no data will be lost)
- Under the main tab (if the array has auto started STOP THE ARRAY) add the new replacement drive via the drop down menus and the start array button will say "replacement drive attached"
- HIT START AND NOT WORRY ABOUT IT FOR THE NEXT 24 HOURS!!!
How to Register a Drive if the Drive is Disabled Due to an Outside Force:
- Stop the array, it's under the main tab scroll to the bottom (very important!)
- un-assign the drive with an error (red x), click the drop down on the drive and select "empty"
- Start the array WITH THE DRIVE MISSING, it should say "drive not installed"
- Stop the array again (also very important)
- re-add the drive through the drop down menu
- START THE ARRAY AND NOT WORRY ABOUT IT FOR THE NEXT 24 HOURS!!! (it'll just rebuild the drive, no biggie)
How to Update UnRaid:
Go to the tools tab
- Go to the "tools" tab.
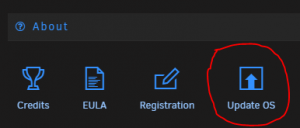
- Under the "About" section select "Update OS" depicted in the image to the right.
- Select check for updates in the top right.
- A script will run, once it is done running hit done, and UnRaid will tell you if there is a new version or if the system is up to date.


