Server Hardening
Overview
Server Hardening is the process of preemptively patching any security vulnerabilities that may arise. This is done by a multiplicity of policy adjustments either manually or run through a script. Scripts act as a blanket when it comes to changing policy, its great for changing lots of different areas on different devices quickly. On the other hand, manual server hardening can be tedious, but gives you the scalpel to change device specific policies that you may want to be enacted. Server Hardening itself is a broad category itself as well, ranging from password policy to remote connection policy, to firewall policy. There isn't any "one size fits all" solutions either, you will have to make some changes depending on the current 24pin policy.
Windows
Windows is one of the most common OSes out there, and is the one you'll most likely find running a server. Its relatively easy to understand what each policy does, its just that with the sheer quantity of policy, it can be somewhat difficult to understand what the whole does.
Manual Server Hardening
Windows has plenty of menus to parse through, making manual adjustments much more of a chore than anything. To find the policy you need, it'll most likely be through Group Policy Management, from there you can edit the default domain policy, wherein everything would be applied to every computer. Though be warned, unless it's something simple like password policy, you won't find what you're looking for unless you know exactly where it is without spending the greater years of your life digging around for it.
Scripted Server Hardening
Scripts can be ran from an elevated PowerShell instance directly, or can be used to create an .MOF file. Ours can be copied and pasted into PowerShell and it will create an .MOF.[1] It may claim that you don't have the required PowerShell module, in that case it should give you the command to install it. If not the required commands are
install-module AuditPolicyDSCinstall-module ComputerManagementDscinstall-module SecurityPolicyDsc
If it still says that you're unable to install the modules, a workaround that I've found is to run the following command.
[Net.ServicePointManager]::Security Protocol = [Net.SecurityProtocolType]::Tls12
Now with that all out of the way, you should have just created a .MOF file, now this MOF file isn't the endpoint. What we just did was compress that whole block of text into something readable by Windows PowerShell, why couldn't we just do it from the.txt file? I don't know ,but this way works so we're rolling with it. Next step will be to run that .MOF file that was just created.
Start-DscConfiguration -Path C:\Windows\system32\CIS_WindowsServer2019_v110 -Force -Wait -Verbose
DscConfiguration will read the script and configure the policy listed in the .MOF file, -path will allow you to put in the path to the MOF, when the MOF is done compiling it should give you the path so make sure to write that down or remember it good. -Force will, well, force its way over any running commands. -Wait will wait for -Force to stop the running command before running the DscConfiguration command, and lastly -Verbose will generate a more detailed output.
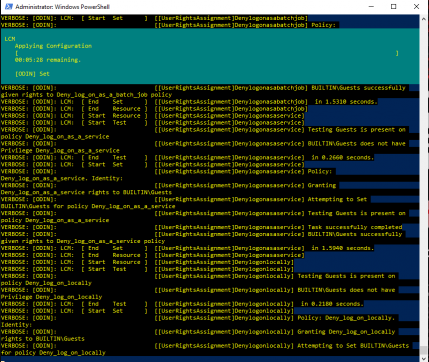
Now you should see all this mishmash of words coming at you, don't worry this is the script doing its job. They aren't warnings or failures, this is what -Verbose does. Otherwise just let it do its thing, the flashing timer at the top should tell you when its approximately going to be done. After that the script is all done and ran, feel free to close PowerShell. Just make sure to double check local and group policy to make sure that the script is in fact functional. Once you've doublechecked, you're all done, just repeat these steps if you're looking to run this script on more machines.
Step-by-Step Scripted Server Hardening
- Open an Elevated PowerShell instance.
- If this is a first time instillation, use the following commands to install vital modules
install-module AuditPolicyDSCinstall-module ComputerManagementDscinstall-module SecurityPolicyDsc- If unable to install required modules, use the command:
[Net.ServicePointManager]::Security Protocol = [Net.SecurityProtocolType]::Tls12
- If unable to install required modules, use the command:
- Copy and Paste the script into the Elevated PowerShell instance and press enter, after a brief delay, you should see the path that the .MOF was saved to.
- Use the command
Start-DscConfiguration -Path C:\Windows\system32\CIS_WindowsServer2019_v110 -Force -Wait -Verboseand use the path that was given to you in place of the path used in the example, and press enter. - The .MOF should now be running, wait for the timer to finish, and it should be opperational.
Linux
Hasn't been publicly documented due to security concerns.
References
Our Modified Windows script for Windows Server 2019[1]
Original Script & Scripts for Server 2016[2]

