Kandji
Relevant Software/Accesses
These are the different software and accounts that you will either need to have or will need Chamberlain for in order to access the relevant materials for managing the Macs through Kandji: - Kandji Account
- Apple School Manager Account
- Apple ID Account (most likely Chamberlain will be the only one who will have this)
- Mac Administrator (24pintech) Account*
*(Make sure the secret sauce stays up to date on the relevant 24pintech usernames and passwords needed for these accounts)
Major Kandji Sections
Blueprints
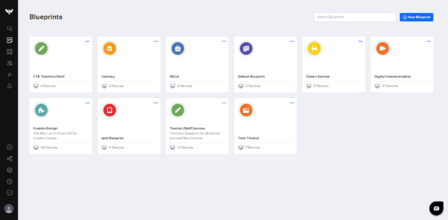
Blueprints - Blueprints are the specific groups that Mac Devices are placed into when they are enrolled. The information Blueprints hold includes:
- Generals and details information about their assigned devices (hardware & network info, MDM profiles, etc.)
- Monitored activity on their assigned devices
- All of the apps that are currently on the device
- The status of apps that have been added to their devices through Kandji
Blueprints can:
- Enable apps added through Kandji for their assigned devices
- Enable and disable rules (parameters) for their assigned devices
- Perform administrative actions on specific devices assigned to them
The Library
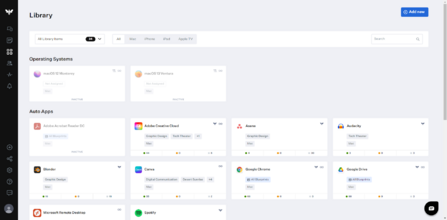
The Library is the catalog where we import and install specific apps, operating systems, profiles, and custom features to be distributed across our Blueprints and directly onto MAC devices. What’s common across these features is the way that they are organized. Features you will commonly run across include:
- Assigning blueprints (a single one, multiple, or none)
- Creating rules - This is how you can limit specific devices on a blueprint from using the feature. You can limit them based on:
- How they were enrolled
- The type of Mac device
- The serial number
- What chipset they use (Silicon, Intel)
- Whether or not the device is supervised
Installation Process:
This is a feature used to control how apps, printers and operating systems are rolled out to the variety of Mac devices. There are several ways to organize the installation process based on what the specific app or operating system is used for.
Choose the installation process
There are three different installation processes that can be used:
- Install Once Per Device: This will automatically roll out the installation a single time on every device it is assigned to. To reinstall the same app you will need to send a blank push on the device.
- Install on-Demand from Self Service: A (section) users can access where apps, printers and operating systems can be downloaded at the user’s discretion whenever they need or want it.
- Continuously Enforce: This option looks different depending on whether the installation being rolled out is already on Kandji or whether it is a custom-built installation. It will take the feature being installed and force it to stay on the device, regardless of user intervention. See more under the Apps section.
Self Service
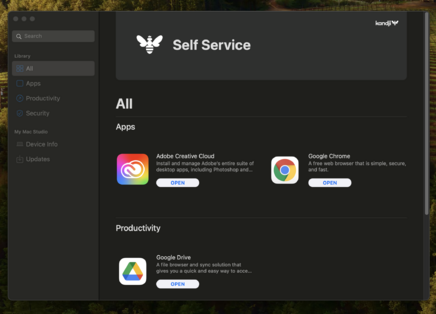
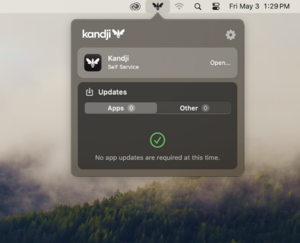
In the top left corner of every device that has been enrolled in Kandji is the Kandji logo (bumblebee). When a user clicks on that icon they can access a section called Self Service. Apps, printers and operating systems assigned to this section can be modified to fit the following:
- Category: Everything assigned to Self Service can be placed into specific categories, including: Apps, Productivity, Utilities and Security. There are more categories that can be added by going into Kandji’s Settings. Items can also be tagged as ‘recommended’ and will have a star placed by the name on the user’s end.
- Customization: The appearance of what’s been assigned to Self Service can be changed here. This includes the icon displayed, the name, and the addition of descriptions, which can be required by users to read before installing. Other options can vary depending on the item being added to Self Service.
Continuously Enforcing
Continuously enforcing is an install feature that requires a device to keep the item installed no matter what, it cannot be removed by the user. The conditions to how this works are different, depending on whether or not the service being installed is already integrated into Kandji (ex: Auto Apps), or if it is a custom install (Custom Apps). Here’s how they vary:
- Audit & Enforce (Custom Apps): For custom apps and services, Kandji cannot automatically enforce them continuously. Their software requires more information in order to understand how to automatically install the app or service and how to manage it afterward. This requires a process called “Auditing”, which involves writing scripts that tell the computer how to process a list of commands without you having to manually do each step. See more information under the Scripting section.
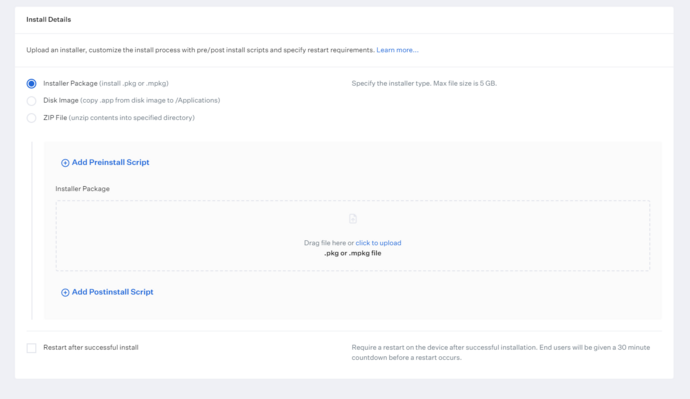
Install Details -Custom Apps
Install Details in a feature unique for Custom Apps. This is where you physically place the files with app install, but all where you will place your pre-install and post-install scripts for any auditing and where you can choose whether or not the device must be restarted after the install. When placing files into Kandji to be run, these are the different file options that they accept:
- Installer Package: Accepts packages, or .pkg/mpkg
- Disk Image: These are .dmg files. They can sometimes be found directly inside Mac apps, along with package, and Kandji recommends that if you don’t have a .dmg you can copy .app from your disk image to /Applications
- ZIP File: Accepts .zip files
Pre/PostInstall Scripts: This is where scripts can be added that will automate extra steps of the install process that the user would usually have to complete, mostly clicking through information and permissions as well as placing your install in specified folders and combating potential errors for ensuring that devices have the proper requirements and in some instances fixing the errors in order to allow for a clean install. See more information under the Scripting section.
General Procedures
Installation
The most important step is that all devices that are going to be enrolled into Kandji must first be assigned to the Kandji MDM server in Apple School Manager. They will NOT show up in Kandji if they’re not in the MDM server.
Assigning MDM
- Go to https://school.apple.com/#/main/devices
- Sign in with the 24pintech apple ID. (This will require double authentication from Chamberlain)
- Go to ‘Devices’
- In the search bar, put in the serial number of the device being assigned to Kandji’s MDM.
- Once the device appears, on the top of the device information, click on ‘Edit MDM Server’
- In the drop-down menu that appears, choose the Kandji MDM
Once this section is done make sure:
- You have a Blueprint prepared to put the device into
- The proper naming configuration has already been set on the device.
From there there are two ways to get a device enrolled into Kandji:
Terminal Setup (requires an admin password)
- Login to the device as 24PinTech.
- Open Finder (white/blue app in the bottom bar).
- On the left side click on Applications. Then open the blue folder labeled Utilities.
- Open the Terminal app and type in “Sudo profiles -N”. Put in the 24PinTech password.
- A notification should pop up confirming the profile has been added. Click the notification.
- Click Allow when prompted to finish the install. Put in the 24PinTech password.
If this method doesn’t work or there are issues, try this way instead:
Manual Device Enrollment
- On Chrome/Safari, type in “mhs24pintech.kandji.io/enroll”.
- Type in the enrollment code for the right blueprint (Teach/Staff Devices Code: 766-167). If you’re enrolling Kandji on a device that is not a teacher computer, ask your MDM manager for the right code for your device.
- Download the profile certificate.
- Make sure to click Allow for Safari.
- Click on the file that is downloaded.
- Click on the system settings (the gear at the bottom) and then click on Profiles.
- Scroll down and click on Install.
- Once the profile says Verified the install is complete.
It is also possible to log into Kandji on a device that has yet to be enrolled and download a one-time enrollment profile but there must be a corresponding Blueprint to put it into.
Manager Duties/Responsibilities
Assigning Blueprints:
Because some devices will require different apps, different updates, different parameters, etc. they cannot all be put in the same blueprint. The blueprints are generally broken down by program + a general teacher blueprint. Here are some of the categories there should be now:
- Teacher/Staff Devices
- CTE Teacher/Staff Devices
- Digital Communications
- Graphic Design
- Tech Theater
- DECA
- Desert Sunrise
Naming Convention:
- To make the devices identifiable use the following naming convention:
- CTE + type of Mac device + Rm. # + TW/SW (teacher workstation/student workstation) + # (starting from 01 going up depending on how many of the same Mac device is in each room.)
Example:
CTEIMAC118SW01 = CTE + IMAC + (Rm.) 118 + SW + 01 Whenever a device has to switch rooms or is moved from one teacher to another the naming convection HAS to be updated so we know what device is where.
ALSO, in the ‘Notes’ section of any device in Kandji, update the note to which teacher now owns the device, (make sure it is updated with the inventory as well).
Assigning Auto App
- First assign the Blueprint (the group of computers) you want to app to be installed on
- Choose the installation type:
- ‘Continuously Enforce’ will install the app once on the device and cannot be removed by the user after that.
- "Install from Self-Service” means the app doesn’t automatically install on the device; users must go to their Self-Service menu and install the app themselves; they can remove it if they want to.
- Choose whether to assign to Self-Service (even if it is continuously enforced, you can still assign the app so that it will show up in Self-Service anyway).
- Assign an option to enforce updates
- You can choose to not enforce updates
- You can choose an option to automatically enforce new updates
- Make sure to set a timeframe that is on ‘Arizona Time’ and is no more than two weeks after the release of the update.
- Make sure to set the time of update to some time after 3:00pm.
- You can choose to enforce a minimum version of an update, which will not be the newest version but will only go down to the oldest version you choose.
- (Optional) Choose whether or not to add the app to the Dock after install
- This will make it so that the application will appear on the bottom bar of the Mac device once it is finished installing
Creating Custom App
- Assign the blueprint/s the app will be installed on
- Choose the installation type
- ‘Once Per Device’ means that the install will only happen once and it may be changed or deleted from the device.
- ‘Audit & Enforce’ means that the installation will be enforced, but it cannot be enforced without a customized installation script to go with it.
- ‘Install from Self-Service’ means the app doesn’t automatically install on the device; users must go to their Self-Service menu and install the app themselves; they can remove it if they want to.
- Choose whether to assign to Self-Service (even if it is continuously enforced, you can still assign the app so that it will show up in Self-Service anyway).
- Choose the correct installer type
- Installer Package (install .pkg or .mpkg)
- Disk Image (copy .app from disk image to /Applications)
- ZIP File (unzip contents into specified directory)
- Place the installation into the space for install packages
- Download an image of the official app onto your computer
- At the very top, write the name of the app being installed into the Title box
- Insert the image of the app into the log box
- Make sure the ‘Active’ button has been turned on
- Scroll to the bottom and the save the changes
(Note: In order to access the pkg version of a dmg file, just find the file in Finder and double click on it. Then drag that pkg file into Kandji.)
Application Blocking:
In the ‘Parameters section of a Blueprint, there is a section called Application Blocking. To block an application:
- Put in the file path of the application
- You can use Command Line to find the full path of an application
- You can also
(note: it is not the same for every device so make sure to check for multiple)
Applications can also be blocked by:
- Clicking on the device in the blueprint you want the application to be blocked on
- Click on “Applications”
- Find the application you would like to block
- Click the three dots
- Click ‘Block Application’
- Click ‘Create’
Renewal Procedures (yearly procedure)
Apple Integration Certificate Renewal
To renew the certificate:
- Click on their ‘Renew Integrations’ link
- Click ‘Download Kandji CSR’ - makes sure its in your downloads folder
- Go to https://identity.apple.com/pushcert
- The proper apple ID is the [[1]] email, the right password should be in the Secret Sauce.
- Once logged in, find the Kandji certificate under Third-Party Certificates and click ‘Renew’.
- Click on ‘Choose File’ and upload the Kandji CSR that was downloaded earlier. Then click ‘Upload’
- Click ‘Download’ to download the new push certification
- Back on the Kandji renew page, upload the push certification that was just downloaded
- Make sure to enter [[2]] where the Apple ID is asked for on step 7, then click “Complete APNS renewal”
- This certificate will last for a year (4/15/2023-2024)
Automated Device Token Enrollment Token Renewal
- Click on the 'Renew Token' link
- Open https://school.apple.com/ and log in with the ID that houses all mac devices.
- Click your name at the bottom of the sidebar, then click Preferences.
- Under Your MDM Servers, select your Kandji server from the list.
- Click Download Token above the server details. The token is downloaded to your Downloads folder.
- Back on the Kandji renewal page, upload the token that was just downloaded. The filename ends in .p7m.
- Click “Complete renewal”.
- This token will last for a year (4/15/2023-2024)
Kandji Support
In order to gain help from Kandji Support through their website do the following steps:
- Click ‘Help’ on the left bar
- Click the blue ‘Login’ button and follow the login steps
- Input the ‘mhs24pintech’ domain
- Enter your user name and password
- Click ‘Submit a ticket’
-
-
Categories:
-
-
